

The first frost date is something that most gardeners view with apprehension, especially when there are green tomatoes on the vine.
Will their plants get to produce a decent harvest, or will a cold snap dash all their hopes and dreams?
You’re following a planting calendar and keeping to the best planting dates, and using only the hardiest crops tried and tested in your area–or maybe you’re just winging it.
For my fellow experimenters and renegades out there, you may be especially concerned when an early cold front creeps in.
I certainly fall into that latter category more than I’d like to admit. Our last frost date is November 30th, so I optimistically planted a few zucchini seeds in late August (they’re now dead–ah, well).
By September, I knew I was leaving it late to prune back our tomato jungle.
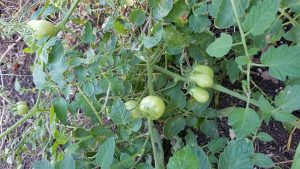
When our temps rapidly dipped down to 34 degrees one night, about a week before Halloween, I felt pretty foolish.
Now, the handful of zucchini sprouts is no big loss, but I must have had fifty pounds of green tomatoes out there, on vines that were now wilted and dying!
Can you salvage what’s left when an early cold snap comes through and decimates your tomato crop?
Often, the answer is YES (if you’re fast about it)!
Pick ‘em green and ripen them indoors!
It’s actually really simple to do, and they still taste fantastic, even without the benefits of vine-ripening. Gardening doesn’t need to be all or nothing, you know.
 Get the book here on Amazon!
So HOW do you ripen green tomatoes?
You’ll need a cardboard box and a few bananas (or apples).
First, go through and pick everything, even the ones that are half-sized. Ignore the fruits that look like they have excessive frost damage (or scorching from the intense southern sun, if you’re in the sort of zone where that’s a problem).
Usually when I harvest, I leave a bit of the leaves on tomatoes, but in this case, since the plants were dying, I removed all leaves on top.

Next, rinse them all off in a big colander, just to remove any clinging debris (or spiders). Look them over for any insect damage.
Now, find either a paper grocery bag, or a large cardboard box–whatever can comfortably fit your harvest.
More from the Guru: Tomatoes Hate Cucumbers: Secrets of Companion Planting + Popular Planting Combinations
You don’t want too much stacking of the fruit, because airflow inhibits mold growth. I used a huge cardboard box so that I could spread out the fruits nicely, instead of having them 3-4 layers deep, on top of each other.
Now, put either a few ripe bananas (or some apples) on top of the tomatoes. Close up the bag or box, but don’t seal it. Let them breathe a bit.
Check on your tomatoes every day or two.
They will likely not all ripen at the same time, which is great–because you’ll have a succession of homegrown tomatoes ripening over several weeks.
Smaller tomato varieties tend to take less time to ripen.
If it seems like your tomatoes aren’t ripening, give it another day or three.
Also, check to make sure that the other members of your household are not, in fact, secretly eating the ripe ones before you see them!
You may need to change out the bananas, too, because they can get really over-ripe in there.
Plan to bake banana bread, or else peel them and freeze them for use in smoothies later.
 Lesson learned? Don’t leave the tomato pruning so late next season!
However, with indoor ripening, I was able to salvage my mistake in time.
We are still enjoying our home-grown ripe green tomatoes in mid-November!
More from the Homestead Guru:
Too Hot? Too Cold? When Should I Plant These? Seed Starting Calendar
Growing Tomatoes Made Easy: Use Rotting Tomato Slices For “Seed Starters”
The Tomato Leaf Myth: Debunking the Poisonous Lie
Grow Food Year Round in a $300 Underground Greenhouse